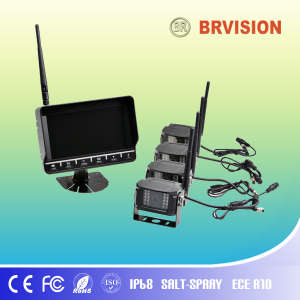
MONITOR SPECIFICATIONSMONITOR SPECIFICATIONS (part# BR-TM7002)
Screen size: 7-inch digital screen (16:9)
Long Life High Resolution: 800 × 480 Pixel (RGB)
System: PAL/NTSC selectable
Contrast: 400:1
Brightness: 450cd/m2
Power supply: DC 12V~24V with reverse polarity protection
Operation temperatures: -30~70ºC
Storage temperature: -40~80ºC
Features: HD sunshade, auto light sensor dimming for buttons and LCD
screen, LED blue light buttons, high quality processor, in-line waterproof fuse
Easy to use OSD menu function via buttons & remote:
image delay on time 0~15s,
(for side cameras) Mirror/Normal image,
multi-language, NEW!
1 / 3" COLOR CCD SENSOR SPECIFICATIONS- With Audio and IR
- TV System: NTSC/PAL
- Aluminum shelled waterproof camera with hex bolts for insured positioning
- Image Type:CMOS, 1/3 Inch Color CCD Sharp® or SONY®
- Horizontal Resolution: 700 TV Lines
- Effective pixel: NTSC: 510 (H) × 492(V) PAL: 500(H)×582(V)
- Illumination: 0 Lux (built-in 20 high output IR LED's for night vision)
- Viewing angle: 120°
- Aluminum housing.
- Waterproof: IP69K
- Shockproof: 10G
- Operating temperature: -40°C to +70°C
- Power supply: 12V DC (powered by monitor)
SYSTEM COMPONENTS 
This monitor can be mounted on the dash and can be mounted on horizontal surfaces. Make sure the view is suitable to the driver to observe the images. Take care not to block any necessary viewing area when mounting. Before
mounting the system, permanently hook up all connections to ensure proper operation.
1. After determining the monitor location, position the monitor support bracket, mark the bolt hole location, and then drill the holes. Be careful not to drill into any other surface that may be hidden.
2. Attach monitor bracket. Mount the monitor to the support bracket with supplied 4 angle adjustment screws.
3. If don't want to screw installation,the bracket also support 3M adhesive.
This camera can be mounted on the back and side,After determining the camera location, position the camera support bracket, mark the bolt hole location, and then drill the holes to mount the camera.
How to Mate Steps1: Turn on the monitor--select channel 1--enter into Menu--select interface to Mate on(press "up" button for On/Off.)--signal waiting
Step2: Press the camera's signal match button to mate with the monitor.
Step3: Successful.

 Relevant products:
  Packing:
| Package Contents: |
| Item |
QTY |
| Monitor |
1 |
| Camera |
1 |
| |
|
| Monitor |
|
| Technical Specifications: |
|
| Operating Voltage: |
12-24Vdc |
| Aspect Ratio: |
16:9 image |
| Brightness (cd/m2): |
450 |
| TV System: |
PAL or NTSC |
| Resolution: |
800x(RGB)x480 |
| Vedio input: |
4 channels |
| Built-in speaker |
available |
| Mirror/Normal: |
available |
| |
|
| Camera |
|
| Technical Specifications: |
|
| Image Sensor |
1/3" CMOS |
| TV System: |
NTSC/PAL |
| IP Rating |
IP 68 |
| Vibration Rate |
10KG |
| Night Vision function |
available |
| Audio function: |
available |
| Horizontal Resolution |
700TV Line |
| Video Output: |
1.0vp-p, 75, |
| Minimum Illumination |
0.1LUX/F1.2 |
| Built-in Lens |
f: 2.8mm |
| Power Consumption |
<1W |
| Lens Angle (Deg.): |
0.5 lux |
| |
| Environmental Specifications: |
|
| Operating Temperature: |
-20ºC~+50ºC.RH95% Max |
| Storage Temperature: |
-40ºC~+70ºC.RH95% Max |

 Company Profile